Because it's nearing October, and because my front door is screaming for a new "fall look", I have decided to create a wreath. I did not want the traditional grapevine wreath, and I did not want the "fall leaf" look, therefore I sought Pinterest for inspiration!! This is what I found......
Isn't it beautiful!! I love it's simplicity and rustic appeal! It doesn't look too intimidating....Let's give it a shot!!
Gather sticks from your back yard....different lengths, widths, and shapes! Break them up into manageable lengths. My longest was about 14".
First you need a base....I cut a circle out of a cardboard box, then I wrapped it with twine so it would have more of an "outdoor" feel!
You will have two layers of sticks to create this wreath! For the bottom layer....
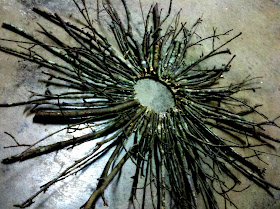
Place your sticks around the base. Try to use straight sticks for this layer! I did not want all of them to be the same length, so I placed varying sizes all the way around. The idea was to make it look more like a starburst! Once you get a layout that is pleasing, use a hot glue gun to adhere the sticks to the base. As you can see in the above picture, you can still see a good bit of the twine....we will fix that with the next layer!
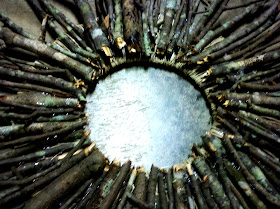
For the top layer of sticks you will be using twigs that have more of a bend and shape to them. You want this layer to project out towards you! Start gluing those sticks on top of the first layer that you made. The shape of the wreath really comes to life when you add this second layer. You no longer have a flat wreath, it is now 3D!
I continued to layer my sticks until the twine base was completely covered!
Because I wanted my wreath to have a little bit of color and bling, I pulled out my handy spray paint and GLITTER!!! oh yes....my fall decor is full of glitter this year!!!
I lightly sprayed the sticks with an Almond color spray paint! Then I generously sprinkled white and gold glitter all over the wreath!! My goal was for it to have a nice glimmer when the sun hits it!!
This is how it looks when the paint and glitter dries!
And here it is on my front door!! You can't really tell in this picture, but when the sun hits it, it has such a nice sparkle to it!!
I am very pleased with the results. Especially since it was practically free. The only thing I had to purchase was the glitter.....and i'm pretty sure I will be using the remainder of that on other fall projects!!!
To see the PARTIES I'm linking to go HERE!!


This is very cool, I love it because it is so natural.
ReplyDeleteIt's beautiful! Adding the glitter is such a lovely idea and I love how it's not the typical wreath.
ReplyDeleteooo... I like this. It's very unique! Pinning right now...
ReplyDeleteI love this! So unique!
ReplyDeleteEmily
I love this and definitely like the price tag. I'm pinning it!
ReplyDeleteI love how this turned out! great frugal project!
ReplyDeleteLina
This wreath has such a fun and natural effect to it! Would love to have you link this up to the Scatter Girls Fall Porch Link Up Party- going on right now! http://scattergirls.blogspot.com/2011/09/fall-porch-linky-party.html
ReplyDeleteIt looks great! What a good idea for a base. It looks really nice on your door too! I am your newest follower. Thanks for sharing. Visiting from Show & Share. Hope you can visit me sometime too :)
ReplyDeleteWhat a great idea. I am a new follower please follow me back at lefthandedideas.com
ReplyDeleteThanks for linking to Things I've Done Thursday! Shared this on facebook today... https://www.facebook.com/pages/Bear-Rabbit-Bear-Craft-DIY-blog/147483145329051
ReplyDeleteMelanie
bearrabbitbear.blogspot.com
Oh, now I've got a fun reason to pick up all the sticks in my yard! LOVE the wreath!
ReplyDeleteI love the addition of the glitter! This looks so good!
ReplyDeleteyour so awesome!!! i love this:)
ReplyDeleteI was so happy to see that you used cardboard as the base instead of buying a foam base or something. My blog focuses on repurposed and recycled design and decor if you'd like to have a peek.
ReplyDeleteMichael
www.bluevelvetchair.blogspot.com
Bravo!! I love how it turned out!
ReplyDeleteThanks for linking up to Show & Share!